Managing invoice data across multiple sales claims can be a challenging task, especially when critical information is scattered across various claim items.
With Kademi’s Arcanum component, you can centralize this data on the Main Sales Claim, ensuring everything is easily accessible and organized.
This guide will walk you through the process of setting up Arcanum to store and manage core invoice data efficiently, helping you maintain consistency and simplify your workflow.
Understanding the Need for Centralized Data Storage
When managing multiple sales claims, it’s crucial to have a centralized location where core data is stored. This not only reduces redundancy but also ensures consistency across your records.
For instance, information such as bank account numbers, addresses, and invoice identifiers can be stored at the top level of a claim, making it easier to reference and manage.
Step 1: Configuring the Claim Type for Arcanum
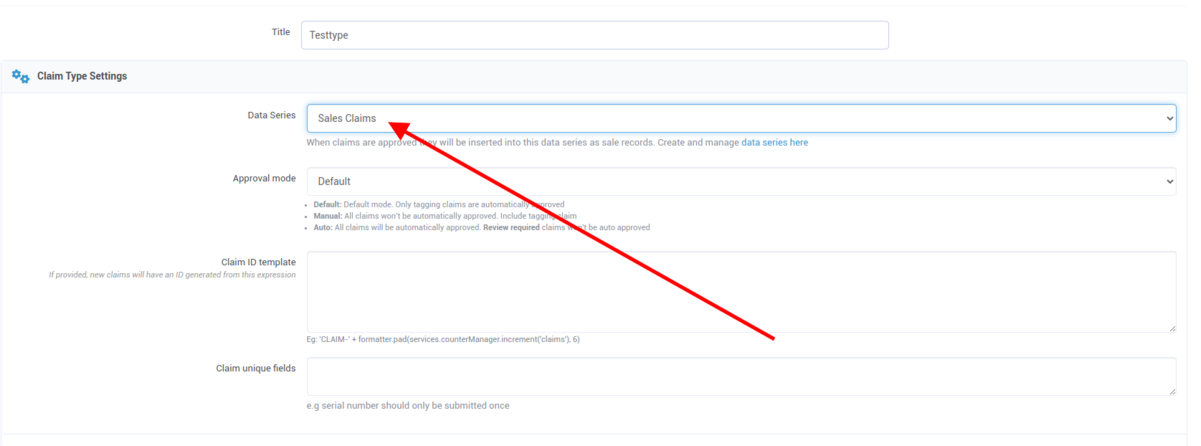
The first step in centralizing your data is to configure the Claim Type that the Arcanum Sales Claim Component will use. This configuration will allow approved sales to be funneled into a designated Data Series, where the core data will be stored.
 To do this:
- Access the Claim Type Configuration: Navigate to the Claim Type that you want Arcanum to utilize.
- Set Approved Sales to a Data Series: Ensure that the approved sales are directed into a specific Data Series. This series will act as the repository for your core invoice data.

By configuring the Claim Type in this manner, you create a structure where all relevant data is stored systematically.
Step 2: Setting Up Fields for Sales Data Records
Once your Claim Type is configured, the next step is to define the specific data fields that will be used to store invoice information. This is done through the Configuration screen for the selected Data Series.

To set up these fields:
- Navigate to the Configuration Screen: Go to the Configuration screen of the chosen Data Series.
- Add New Fields: Scroll to the bottom of the page and click the “Add Fields” button. An input screen will appear, allowing you to configure the field names.
Here, you will need to specify the exact fields that will be used to extract data from the invoices. It’s important to note that these field names are case-sensitive, so they must be entered exactly as required.
Key Field Names and Their Usage
The following field names can be utilized to extract and store data from the invoice onto the Sales Claim, and subsequently onto the Sales Data Record:
- bankAccountNumber: This field stores a numerical string, typically a 9-digit number separated by dashes, representing a bank account number or other banking-related digits.
- receiverAddress: This field captures the address of the entity that is receiving the items listed in the invoice.
- vendorAddress: This field stores the address of the entity that sold or supplied the items in the invoice.
- vendorDeliveryAddress: Similar to the vendorAddress, but this field may differ if the delivery address is not the same as the vendor's primary address.
- invoiceReceiptId: This alphanumeric field stores the unique identifier for the invoice, which is crucial for referencing the invoice in future transactions.
- vendorName: This field captures the name of the vendor or entity that sold the items listed in the invoice.

These fields allow you to extract vital information from the invoices and store it at the Claim level, making it easier to manage and reference.
Additional Fields for Claim Items
In addition to the core fields mentioned above, specific data can be stored on individual Claim Items rather than the main claim. These fields are configured within the Claim Type Settings for each Claim Item:
- tax: This field stores the tax amount associated with the product referenced in the Claim Item. It is specific to the individual Claim Item and will not be stored on the Sales Data Record.
- subtotal: This field captures the subtotal listed on the invoice for the Claim Item, usually excluding any additional fees. Like the tax field, it is specific to the Claim Item and not stored at the claim level.
By setting up these fields within the Claim Item Settings, you ensure that all necessary data is captured at the individual item level, providing comprehensive records for each transaction
Step 3: Reviewing and Finalizing Your Setup
Once you’ve configured the fields and mapped the necessary data from your invoices, the final step is to review your setup and ensure everything is functioning as expected.
- Test the Configuration: Scan an invoice using the Arcanum Sales Claim Component and verify that the configured fields correctly populate with the relevant data.
- Check Data Consistency: Ensure that the data flows from the invoice to the Sales Claim and subsequently into the Sales Data Record within the Data Series.
If your invoice references these fields correctly, Arcanum will automatically extract and store this data, streamlining your sales claim process and reducing the potential for errors.
Wrapping Up
Storing core invoice data on the Main Sales Claim using Arcanum is a powerful way to centralize and manage your sales records. By following the steps outlined in this guide, you can efficiently configure your Claim Types, set up essential data fields, and ensure that all necessary information is stored in an organized and accessible manner.
This setup not only enhances your data management but also simplifies the process of referencing and approving claims. With the Arcanum Sales Claim Component, you can be confident that your sales records are comprehensive, consistent, and ready for any audit or review.