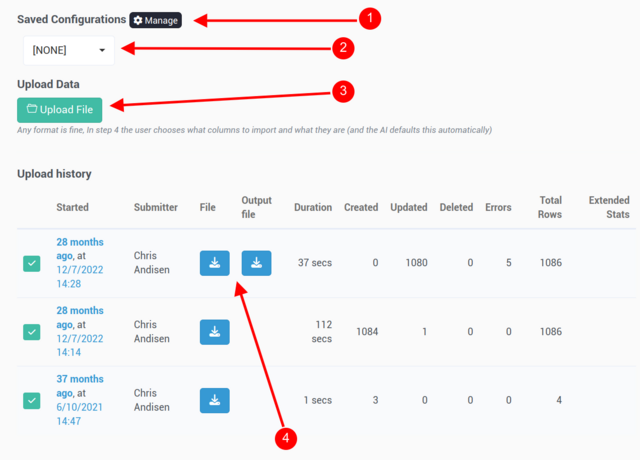
First Screen

- This is where you manage the list of saved configurations.
- This is where you select a configuration to apply saved column mappings, table uploader actions, and sanity checks.
- This is where you upload your spreadsheet file containing the data you wish to import into the system.
- This is where you can download files related to previous import operations.
Second Screen
There will be a list of Options specific to each Table Uploader type, There are too many to list on this page alone but they are related to how the data should be imported
Third Screen

This is where you can add your own actions for manipulating the data or determining what to do once the upload is complete.
A few examples already available include sending an email notification upon completing the upload or skipping rows where a certain column is blank (e.g., if uploading user data, you could skip a row entirely if there is no email entry for that row).
Fourth Screen

The Map Columns page is where you select which columns in the file you uploaded correspond to the fields in the given Table Uploader.
For example, if you are uploading user data, you will map fields related to the profile, groups, and organizations.
- You can choose which row to start from. Typically, this would be row 1, as the first row in a spreadsheet usually contains header titles corresponding to the columns.
- This is where you map each column to its corresponding field.
- A snippet of the data you are about to import is displayed here. This is useful for understanding how to map the columns correctly.
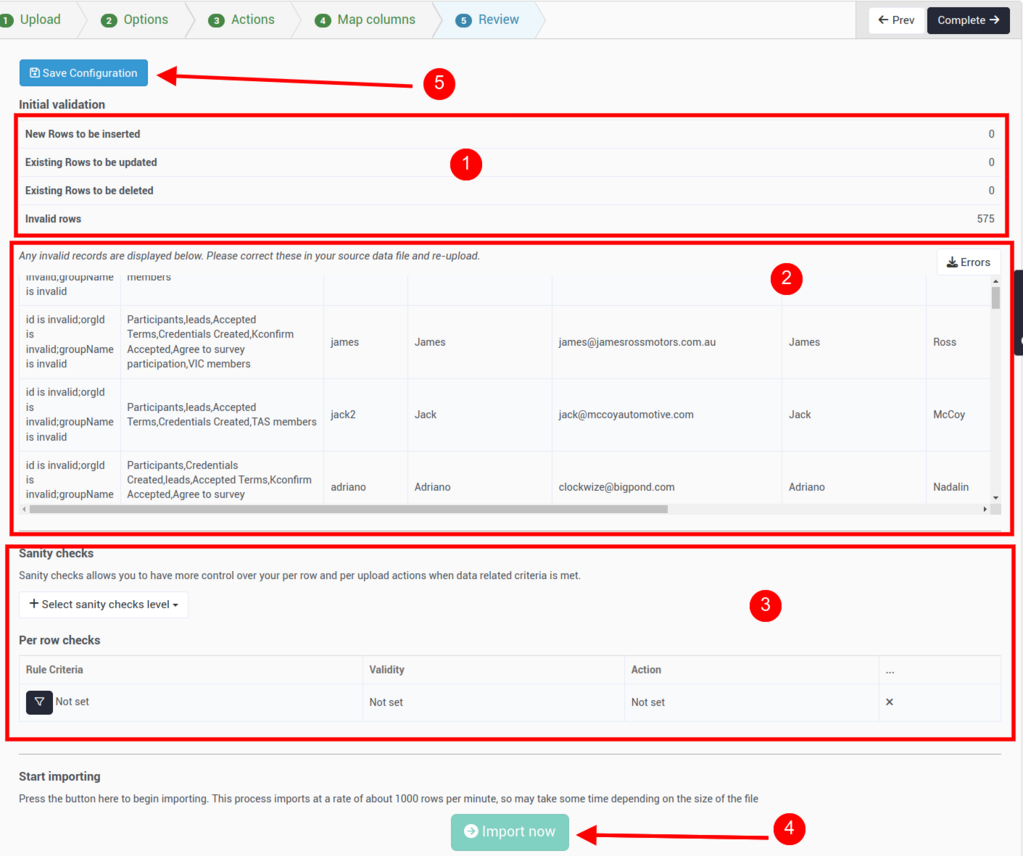
Fifth Screen

This screen displays the validity checks before the data is imported into the system. Every row in the file must pass validation based on the configurations you set earlier.
- Displays the number of rows expected to be created, updated, deleted, or marked as invalid.
- Highlights any invalid rows found during the validation process.
- Allows you to add sanity checks for additional control over the data.
- If all rows are valid, you can proceed with importing the data.
- Provides an option to save your configurations for future use.
.


Sanity checks provide greater control over your data, allowing you to set up a blacklist or whitelist.
-
Rule Validity: You can define whether a rule being matched deems the data as valid or invalid.
-
Rule Action: When a rule is matched, you can configure an action to take, such as ignoring the row, failing the batch, or notifying the admins.
- If the rule validity is set to "valid," you may only want to notify the admin.
- However, in most cases, sanity checks are used to identify and handle invalid data.
-
The Add Rule button uses a user interface similar to the Query Builder.

This is where you set up the rule criteria for validity and action.
You can configure it so that if a certain field meets specific criteria, it will be considered a successful match.