How to use Kademi with Salesforce

Blank 6/4/2023 12:37 - 6/4/2023 12:37

The Salesforce app allows you to sync your profiles, organisations and/or leads between Salesforce and Kademi. This tutorial will go through the process on how to set that up.


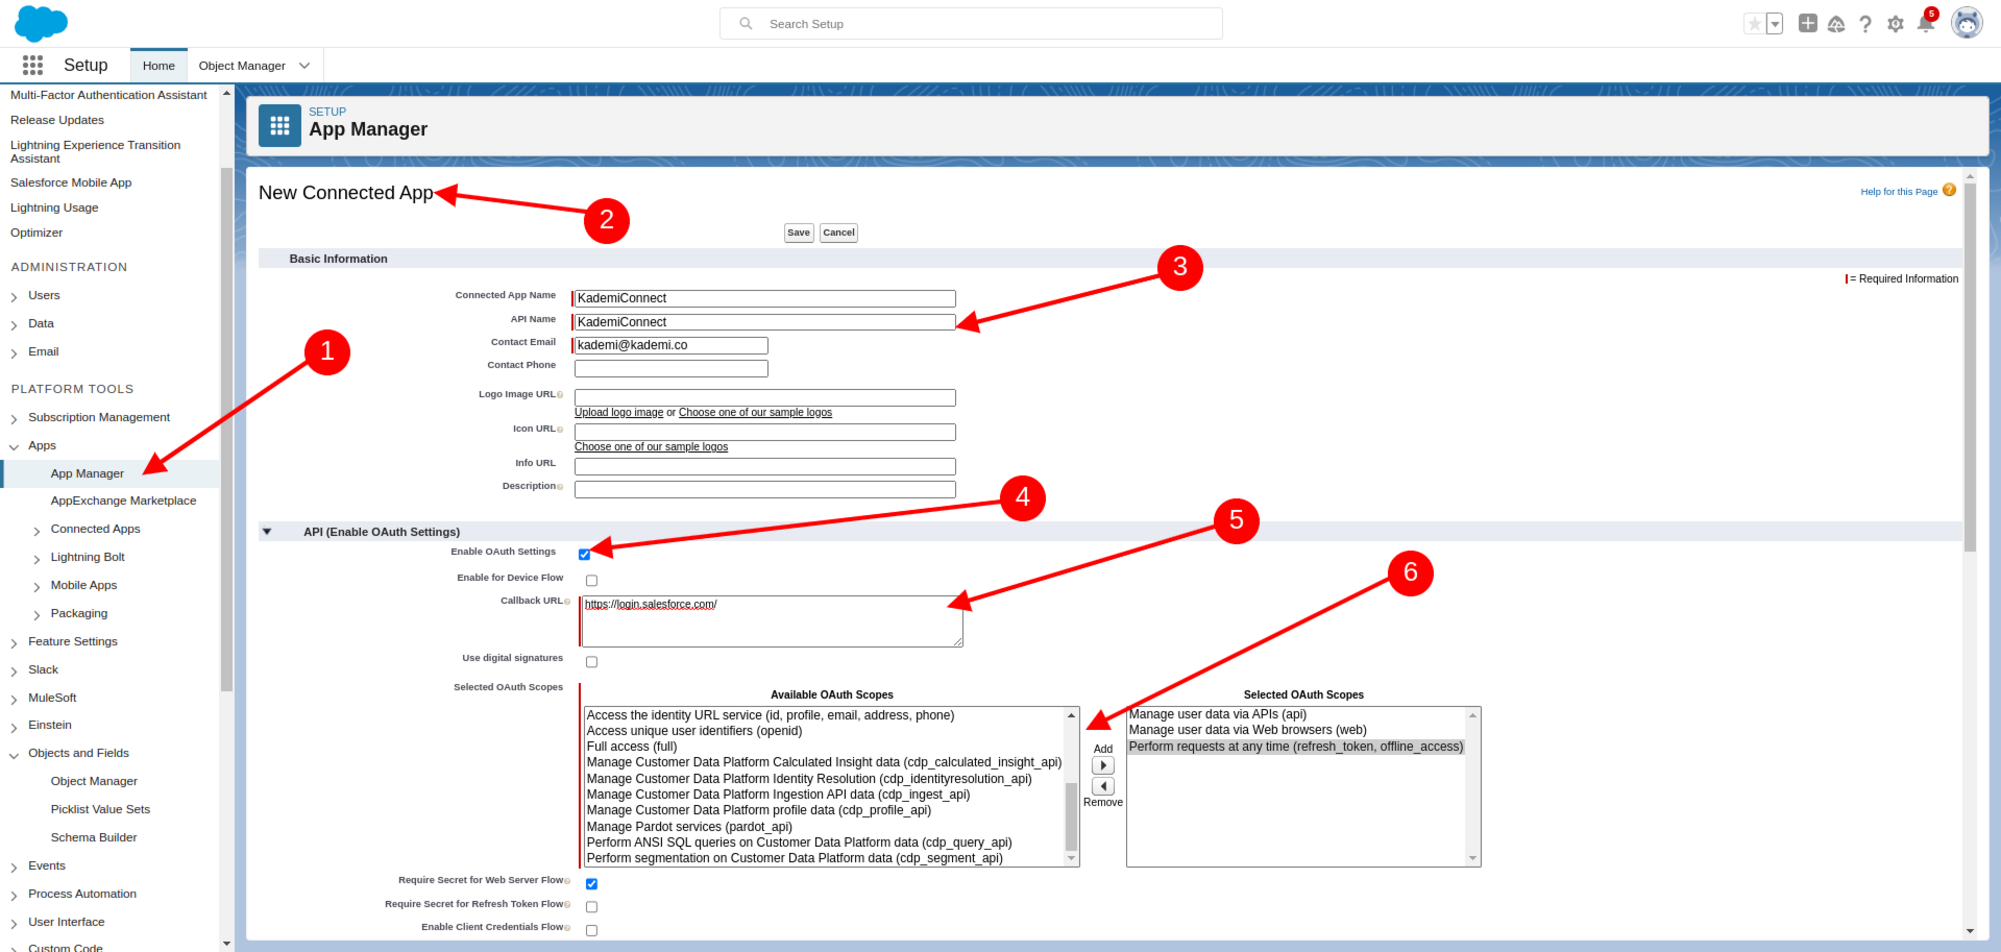
First, you need to create a connected application in Salesforce:

1. In Salesforce, go to your App Manager 

2. Create a new Connected App

3. Fill in the necessary details for the Basic Information section

4. Tick Enable O-Auth Settings

5. Fill in the Callback URL

6. Add the following OAuth Scopes depending on what you'll be using:

  • Manage user data via API (api) - Required
  • Manage user data via Web Browsers (web)
  • Perform requests at any time (refresh_token, offline_access)

Once you've finished setting up the app, click save to continue.


Once you've created your app, you'll want to click on Manage Consumer Details. This will take you to a page where you can view your Consumer Key and Consumer Secret fields. Note these fields down as we'll be using them later in Kademi.


Next, you'll need a security token. If you don't have one already, click on your profile in the upper right page and then click settings. In your profile settings, click on the Reset my Security Token tab. Now click on the Reset Security Token button

You'll then receive an automated email from Salesforce with your security token. Note this down, as we'll be using it in Kademi.


Before we can move on, we'll need to create a custom field in these Salesforce objects, Contact, Company, Opportunity and Lead.

Click on the Object Manager tab, scroll down to find an object and click on it.

On this page, click on Fields & Relationships and then click on New to start creating a new field.


In the first step, select the Text data type. On the second step, fill in the following fields:

  • Field Label: This should be called Kademi ID
  • Length: Fill this in as 36
  • Field Name: This needs to be called Kademi_ID
  • Unique: This should be checked. Make sure you check the second option
  • External ID: This should be checked.

For the third and forth steps, you can simply use the default settings.

Once you've created your custom field, repeat the process for the remaining objects, Contact, Company, Opportunity or Lead.


Now, we can move onto setting up Salesforce in Kademi. First, install the Salesforce application in your Kademi account through Website Manager > Market Place.

Then navigate to Apps which is also located under the Website Manager tab.

Next, search up the Salesforce app and then click on the cog to open up the settings.

 Here, you'll want to fill out the following fields from your Salesforce account:

  • Client ID: Use the Consumer Key from earlier in the tutorial
  • Client Secret: Use the Client Secret from earlier in the tutorial
  • Security Key: Use the Security Token from earlier in the tutorial
  • Username: username for your salesforce account
  • Password: password for you salesforce account

Once you're done, click Save.


Next, we'll set up a Sync Job to run the process. In the Data tab, click on Sync Jobs. From here, click on Add Sync Job.

Fill out the following fields:

  • Sync Job Name: Enter a unique name for the job
  • Sync Provider: Select SalesForce CRM Sync Provider
  • Sync Direction: Choose whether to sync from Salesforce to Kademi, Kademi to Salesforce or to sync from both directions.
  • Sync Types: Choose whether to sync profiles, organisations or leads. You can select more than one option.
  • Schedule Mode: Choose whether to have the sync run on a specific schedule or only when you choose to run the job.


Next, click on the Status icon for your newly created Sync job to enable it. Click on the edit icon to edit some additional settings for the job.


From here, you can filter what gets synced from Kademi or Salesforce. 

  • For profiles, select which groups are synced to Salesforce and/or which groups profiles synced from Salesforce are added to. - Required
  • For leads, select which journey leads are synced to Salesforce. - Required
  • For organisations, you can select which organisation types are synced to Salesforce.
  • You can also filter for one or multiple campaigns from Salesforce.

Once you've configured your settings, click Save. 


And that's it. From here, if you've enabled your sync job, you can click Run on this page to run the job.