DocuSign is the world's most popular platform to electronically sign off on documents and agreements from anywhere in the world.
In this blog post, we will go over how to integrate your DocuSign account with Kademi.
Installation
The very first step is to install the DocuSign application into a website.
Use the search bar at the top of the screen and type "Websites", then select the result to go to Website Manager > Websites.
Then click on the ⚙️ icon next to the website that you want to install DocuSign to.

Click on 'Find more apps' to enter the market place.

From the Market Place, search for 'DocuSign' and then click on the application.

Then click on 'Install in {website name}' and wait for it to finish installing.

Integrating DocuSign with Kademi
The next steps are to link your DocuSign account with Kademi. If this is your first time using the DocuSign app you will need to sign up for a DocuSign developer account before you can proceed.
After you've installed the application, use the search bar at the top of the screen and type 'DocuSign', then select the result to go to the DocuSign app.
If no account is linked yet, you'll see a message letting you know: "No DocuSign account is currently linked to Kademi. Please use the Link with DocuSign button to link your account." Click Link with DocuSign to start the setup wizard.

Again, make sure that you have a DocuSign account ready to go before proceeding and clicking on 'Get Started'.

In the next step, choose whether you are using a Sandbox or Production environment type for your DocuSign account, then click Next Step.

DocuSign Account Details
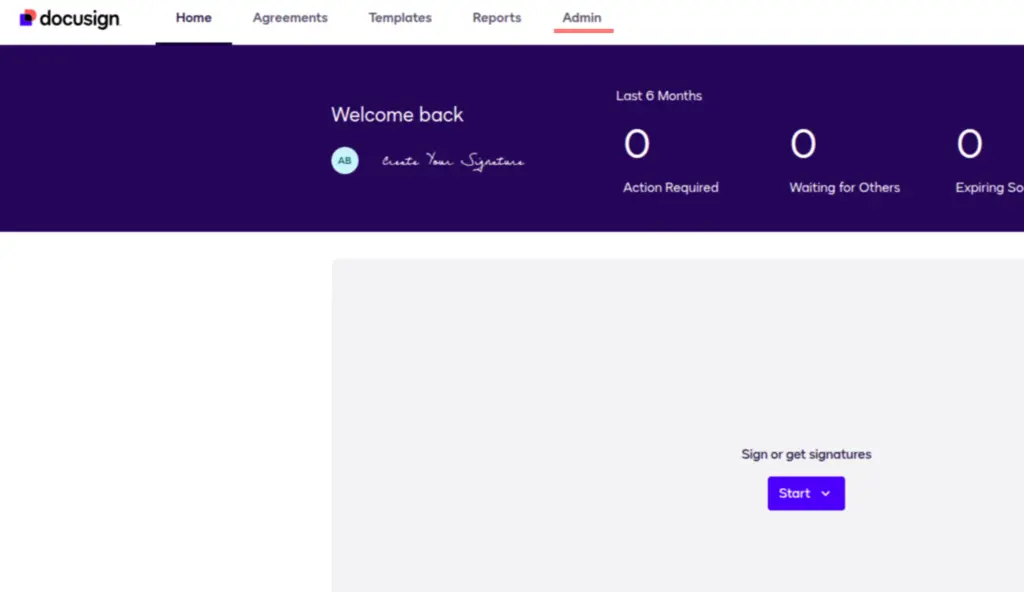
From here, you'll want to create a Connect Key in your DocuSign account. If you already have one, then you can skip these next steps. First, you'll want to head over to the 'Admin' page for your account.
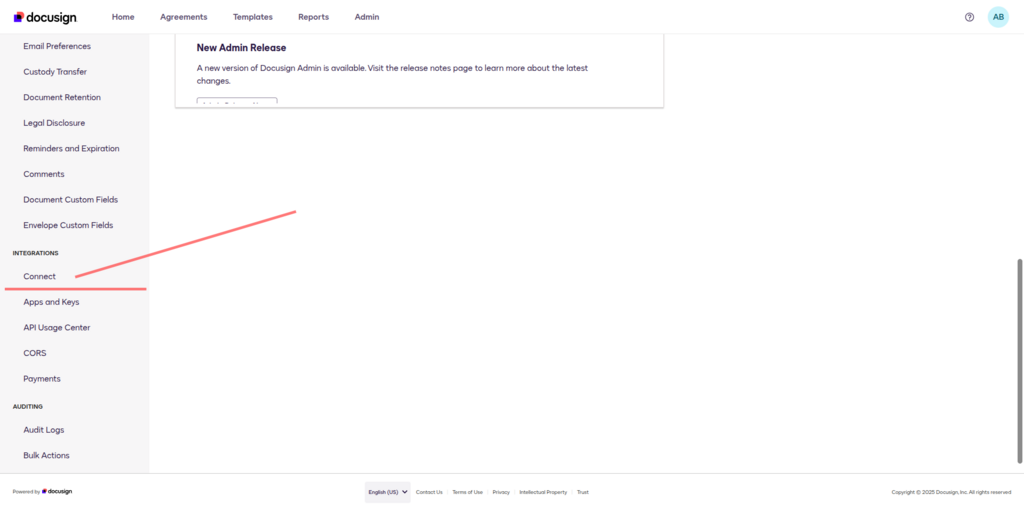
In your DocuSign settings on the left pane, scroll down to the INTEGRATION section and then to Connect.
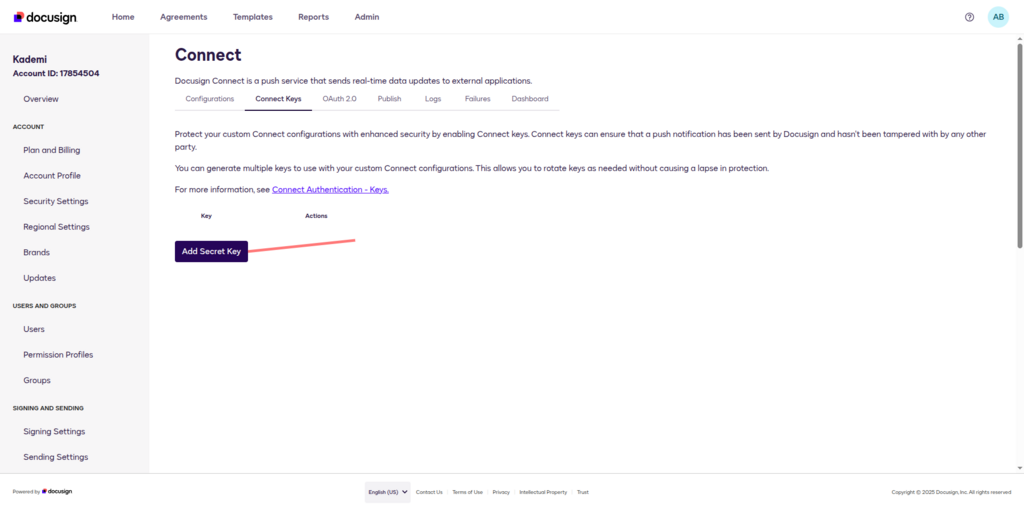
From here, you'll want to click on CONNECT KEYS. To generate your key, click on ADD SECRET KEY.
Linking your DocuSign account with Kademi
Select the Website you want to use DocuSign with, then paste your Connect Key into the field, and click Next Step.
 If prompted, click Link with DocuSign on the Consent step.

You may see a DocuSign consent screen asking you to Allow Access — If prompted, click Allow Access to link your Kademi account with DocuSign. (If you've previously authorized this connection, DocuSign may skip this consent step.)
The final step is to confirm the account you will use with DocuSign, then click Confirm Account.

Once linked, you can view or manage your connection anytime from the Account tab (alongside the Envelope Settings tab covered above).

Mapping Envelope Custom Fields
If your DocuSign envelope has custom fields (e.g. reference numbers, customer IDs) that you want pre-populated automatically, you can map them to Kademi data from the Envelope Settings tab.
After linking your account, go back to Talk & Connect > DocuSign, then click on the Envelope Settings tab (next to Account).

Here you can configure:
- Envelope Id — the ID of the DocuSign envelope you want to map fields for
- Envelope Fields — for each custom field on that envelope, enter either static text or a KCode (e.g.
) to populate it dynamically
Click Save once done.
Once the envelope is sent, the mapped values will appear under Envelope Custom Fields on the DocuSign envelope, confirming the fields were populated correctly.

Setting up a Journey to use DocuSign
Now that you've linked your Kademi account with DocuSign, we are now going to setup a journey to test its functionality. If you need a refresher on how journeys work, then take a minute to look over these tutorials as well as this tutorial on onboarding journeys.
For this section, we'll be using templates from DocuSign. You can use this tutorial from DocuSign to create your templates.
We'll be creating an onboarding journey that will capture any user registrations as well as any accepted invitations to the program. It will then send off a document for the user to sign.
First, we'll set up the beginning of the onboarding journey as detailed in the tutorials.
Next, in the 'Nodes List' to the right, look up the DocuSign nodes. You'll want the 'Send a DocuSign Envelope' and 'DocuSign eSignature Event' nodes.
Next, connect the nodes like so. Click the for the 'Send a DocuSign Envelope' to access its settings.
First, under the 'Template' setting, select the template from DocuSign that you wish to use.
If you've configured custom field mapping in Envelope Settings (see above), double-check that the Envelope Id shown here matches the one you entered there — this confirms your custom fields will populate correctly when the envelope is sent.

After you have selected your template, the recipient settings will populate depending on how you configured the recipients on DocuSign. In the example below, there are two recipients that need to sign.
First, is the owner of the document. In the journey, fill out their email address in the field under the Owner role.
The second is the main recipient/lead profile for the journey (the person who has registered or been invited to the program). We will be using a KCode to grab the lead profile's email address. You can simply copy and paste the KCode below without any spaces.
* |currentLead/leadCustomerProfile/email| *
Your settings should then look something like this.

For the 'DocuSign eSignature Event', it isn't strictly necessary to configure any settings for it. You can however, create processes for when the user signs or declines signing the document. To keep things simple, we won't cover that here. Important - a valid CSRF Token is required for webhooks to work. More info can be found here.
To test out the journey, we can have a test user go through the registration process or send an invitation email to them.
Once you have done that, the user should recieve an email from DocuSign.
By clicking 'Review Document', they will be taken to DocuSign website, where they will be able to sign the document.
